- Duralawn
- Artificial Grass Landscaping
- Xeriscaping
- Drip Irrigation Installation
Drip Irrigation Installation
A drip irrigation installation might be one of the smartest decisions you can make for your home or business. Whether it's a simple system providing water for patio planters or an elaborate underground network of drip emitters for an array of different plants, you'll be installing the most efficient and cost effective watering system available. A drip irrigation system will water only what you need so you'll have less weeds, healthier plants and many other benefits that come with targeted spot-watering.

If you are choosing to install drip irrigation because you want to reduce your monthly water bill or take on a complete makeover of your yard you'll be happy to know that drip irrigation is the future of irrigation. A yard that combines drip irrigation technology, artificial grass products and the basic fundamentals of xeriscaping is not only a great way to reduce water usage, costs and maintenance it's also going to look great for many years.
Drip Irrigation Installation Guide
This drip irrigation installation guide will go over the basics including how the system works. A drip irrigation system that's designed and laid out properly will keep potted plants, gardens, flower beds and landscapes happy with a fraction of the water required with traditional sprinkler systems. Keep in mind that every landscape is unique with different soil, plants, climate and weather conditions. Part of the planning is to take a look at all the unique factors that affect how much water to distribute and customizing it with precise emitter placement.
The Design Layout
Lay Out Tubing
Connect Drip Emitters
Attach System to Faucet
The Design Layout
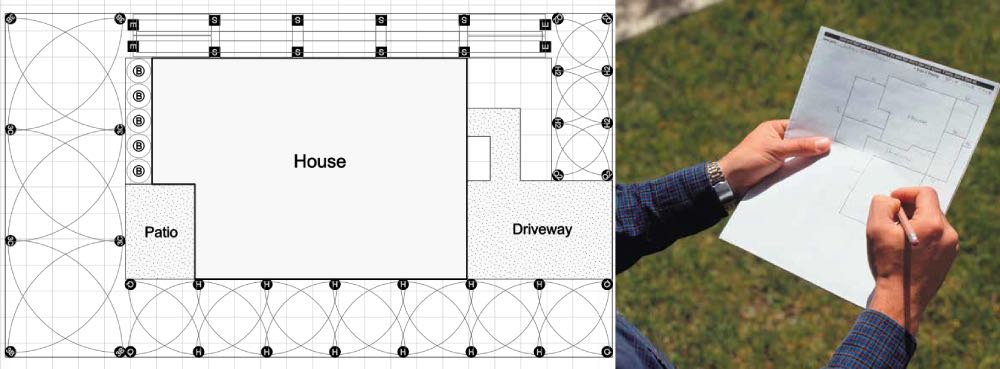
If your drip irrigation installation goes beyond a basic single garden hose network supplying water for a few patio planters, a design plan is absolutely imperative. You will need to do a bit of homework and every minute you spend planning is worth it many times over in the long run. The design should include measurements, drawings, hydro zones and emitter placement. Many top irrigation manufacturer's offer a free sprinkler system design service available to residents of Canada and the USA that includes a detailed plan and itemized shopping list.
The drip irrigation installation design layout should include a drawing of the area to be landscaped, plant types and hydro zones if applicable. The emitters should be placed keeping in mind flow rates and water requirements for specific plants. Skip down to the section on how to determine flow rate using a bucket and a timing device.
If you identify that you will have low pressure issues or you want to automate your system with an irrigation controller, installing multiple zones is the best option. Utilizing multiple watering zones will give you complete control over the timing; duration and frequency of each zone and works especially well when combined with an irrigation controller.
Lay Out Tubing
We recommend laying out the tubing before connecting it to the faucet or water source to get an overview of how you want to run the mainline to your plants. The tubing will also be a lot easier to work with if it is allowed to lay out uncoiled in the direct sunlight. If your drip irrigation installation includes many hydro zones you will need to plan intersections which will likely include T-fittings, elbows and valves.
The 1/2" mainline tubing can be placed on top of mulch or buried underneath 2-3 inches of mulch if you would like to conceal it. Keep in mind that the 1/4" inline plastic tubing branching from the mainline will be visible unless it's covered by plant growth. If you are using landscaping fabric you can place the tubing above or below the fabric being mindful that repairs or adjustments will be easier if the tubing is placed on top of the fabric.
If you are running an underground drip irrigation installation system you should use PVC pipe instead of the regular tubing because it's more durable and able to withstand a lot more wear and tear. Sturdy PVC piping is ideal for covering longer distances in straight lines but not ideal for tight spaces.
The mainline tubing should be staked down every 3 to 4 feet to keep it in place. It's a great way to hide the tubing under a few inches of mulch, rock or top of soil.
Connect Drip Emitters
The drip emitters are the final step to setting up the tubing and irrigation distribution. This is where you are taking the mainline delivery system and delivering it to each individual plant, bush or tree. The 1/4" or 1/8" tubing needs to be punched and attached to the mainline and on the delivery end you will place the emitter. The length of the line will be determined by how far you have to take water from the mainline to the plant. You may also punch the dripper directly into the mainline.
Drip emitters are rated for a flow rating anywhere from 0.5 to 4 gallons per hour and should be placed according to the water demands.
Attach System to Faucet
A proper drip irrigation installation needs a few vital components that will not only keep the system running smoothly, they help prevent damage to system parts including keeping your drinking water safe. The head assembly is the collection of essential parts where you attach the system tubing to the faucet. These components can be purchased and installed separately but in some cases they are combined in one convenient pre-assembled unit. We recommend using the same brand for all parts to avoid compatibility and leaking issues.
Y Valve (Optional)
Timer or Controller (Optional)
Backflow Preventer
Filter
Pressure Regulator
Adapter
Y Valve
A "Y" valve or hose splitter is a great idea if you want to use multiple zones or you want to be able to use the faucet with a separate garden. It's a relatively inexpensive way to leave that option open and allow you to include more irrigation zones or add more plants to your yard. A quality Y valve hose splitter should be threaded, metal and have easy to use handles. If you are adding multiple hydro zones there are valves with multiple splitters available.
Timer or Controller
A basic water timer is often battery operated and will control on and off functions for specific days of the week. An advanced electric hardwired irrigation controller is capable of controlling time, duration, date and some smart controllers will even remotely use local weather data to automatically adjust watering times. The controller should be attached before the head assembly directly on the faucet or water source and if you decide to use a smart irrigation controller with remote wifi operation you will need to install a wireless valve.
Back Flow Preventer
The backflow preventer is attached directly to the water supply and restricts unwanted reverse flow of water in a plumbing system. If water flow is allowed to reverse it could potentially contaminate household drinking water. This poses a significant health risk as well as increases the risk of clogging household faucets and other issues.
Filter
The filter or screen mesh is vital to keeping the drip irrigation lines clean and clear of dirt and debris that can lead to clogged emitters and other performance issues. If you are aware that your local water supply has impurities this is even more important. The screen may be part of the head assembly or separate but either way it should be cleaned periodically as needed.
Pressure Regulator
The pressure regulator is a necessity for any drip irrigation installation. It lowers the water pressure to an optimal operating level and since the average residential water pressure is too high, it's almost always required. The ideal psi for residential drip irrigation systems and sprinkler systems is between 25 and 30 psi and a pressure regulator helps achieve this. If you'd like to test the psi of your system we recommend using a water pressure test gauge.
Adapter
An adapter may be needed to step your head assembly down to the 1/2" mainline tubing. This is where it becomes important to use the same manufacturer or brand for your entire irrigation system. It can be really frustrating trying to adapt different lines because they aren't all sized the same when you cross brands.
A drip irrigation installation kit is an easy way to starting using spot irrigation in your own yard. They are incredibly easy to install and add more zones or emitters when needed.

How Much Water Do Plants Need?
How much to water plants is a very important question especially when it comes to planning your drip irrigation installation. There are baselines or averages that you can start from and adjust from there. The end goal is to water just enough to maintain healthy plants without under watering or wasting water. Keep in mind that it's beneficial to water deeply and infrequently versus low amounts at higher frequencies. A general rule of thumb is to keep watering times between 2 and 6 hours in duration.
Typical Water Requirements by Plant
The typical water requirements for plants in Canada is difficult to determine exactly because there are many variables. There are some general rules to follow however that can give you a great start. A good way to determine roughly how much water a plant needs is to measure the canopy diameter or growth area. The following table shows water requirements in gallons based on the plant canopy or area of growth followed by examples for watering various plants in the average Canadian climate.

Typical water output by device:
- Drip Emitter > .5 to 4 gallons per hour
- Micro Bubbler > .5 to 2 gallons per minute
- Garden Hose > 2 to 5 gallons per minute
Tree with 10' Canopy
A tree with a canopy diameter of 10' requires 60 gallons of water at each watering interval. An ideal drip irrigation installation setup would be 5 emitters placed in a circle mimicking the canopy of the tree above with a 4 gallon per hour rating and running them for 3 hours. Another option would be to operate the same 3 emitters in a triangular pattern over a 5 hour period.
Option 1. 5 drip emitters × 4 gallons per hour > 20 gallons per hour × 3 hours = 60 gallons
Option 2. 3 drip emitters × 4 gallons per hour > 12 gallons per hour × 5 hours = 60 gallons
Plant with 8' Growth
We can see in the water usage graph above that a shrub with an 4' diameter growth area requires 12 gallons of water at each watering interval. The ideal setup would be a single drip emitter rated for 4 gallons for hour operating for 3 hours. The second equation provides another drip irrigation installation option for the same plant.
Option 1. 1 drip emitter × 4 gallons per hour > 4 gallons per hour × 3 hours = 12 gallons
Option 2. 2 drip emitters × 3 gallons per hour > 6 gallons per hour × 2 hours = 12 gallons
Plant with 1' Growth
A small plant with 1' diameter growth requires 0.5 gallons of water in its watering interval. This represents a potted plant or even a small flower that's part of a flower bed. A good option is to use a drip emitter rated for 0.5 gallons per hour and operate it for one hour or use a higher rated emitter for less time.
Option 1. 1 drip emitter × 0.5 gallons per hour > 0.5 gallons per hour × 1 hour = 0.5 gallons
Option 2. 1 drip emitter × 4 gallons per hour > 4 gallons per hour × 15 minutes = 0.5 gallons
Most plants and trees only need water when they start to wilt, a tree that has wilted leaves during the day may not need water unless it also has wilted leaves at night.
Water in the cool hours of the morning instead of late evening to decrease evaporation, promote deep root growth and prevent fungus growth.
Use an automatic irrigation controller with rain sensor that will delay watering during times of rain and low heat - saving water and money.
A rain barrel that collects runoff from downspouts can be used to water patio plants and gardens.

How to Determine Flow Rate
Determining the flow rate of your irrigation system requires measuring the water flow in gallons per minute (GPM) or gallons per hour (GPH). This is important for understanding the limitations of your unique system and preventing damage that can be caused by too much water pressure in the system.
- Purchase or obtain a bucket that is measurable in gallons.
- Locate the faucet or spigot where the drip irrigation installation will originate.
- Fill the bucket on full pressure while recording the time it takes to fill the bucket or achieve one gallon of water.
- Take the size of the container in gallons and divide it by the time it took to fill it.
- Multiply the above number by 60.
- The end result in the flow rate of your water supply in GPM. If you require a reading in gallons per hour or GPH, multiply that number by 60.
Example 1
A 5 gallon (18.9 litre) bucket that takes 30 seconds to fill has the following equation.
5 ÷ 30 = .167
.167 × 60 = 10 GPM
10 × 60 = 600 GPH
Example 2
A 3 gallon bucket that takes 20 seconds to fill has the following equation.
3 ÷ 20 = .15
.15 × 60 = 9 GPM
9 × 60 = 540 GPH
Converting to Drip Irrigation
Converting an outdated or inefficient underground sprinkler system to drip irrigation is really easy to do with a quality drip irrigation conversion kit. The existing sprinkler heads can be left in place and the only alteration required is to remove and replace the internal manifold and components. Instead of the sprinkler head popping up and emitting water in a spray, you can utilize spot irrigation by running the drip hose from the sprinkler head wherever water is needed.

You can create a custom watering zone for each sprinkler head or add zones separately as required by your specific drip irrigation installation plan. Any heads that aren't being used can be easily capped with a properly fitted sprinkler cap. This method is the easiest because you don't need to dig up and cap the main line but it might be required if you can't find a cap that creates a water tight seal.
It's important to find a cap designed for your specific sprinkler head manufacturer including brand, series or model to ensure a proper seal when capped. With any drip irrigation installation it's imperative that all parts are compatible, we recommend using the same manufacturer to eliminate issues.
Common Design Mistakes
Since no two landscapes are the same it's common to run into unique challenges during the drip irrigation installation process. It could be that you have a steep slope with poor soil or you have several types of plants each requiring differing amounts of water. It's always best to plan ahead to avoid issues before they become an annoyance or end up costing money to remedy.
Plant Types
If you have several different types of plants it's important to do your research and create a detailed irrigation system plan. If you are incorporating xeriscaping with various plants, shrubs, flowers and grasses you may need to create separate zones or emitters with varying flow rates. If a plant is in full sun, on a slope, receives lots of wind or planted in high drainage soil it will require more water than a plant that's protected in the shade or situated in soil with high water retention.
Water Pressure Issues
If you experience water pressure issues immediately after your drip irrigation installation be sure that you installed a quality pressure regulator. If you checked your flow rate before the installation and you know that you have adequate pressure it's a matter of troubleshooting why you aren't getting enough pressure or you have too much. You may need to install emitters with a higher or lower flow rating or add a separate watering zone to allow you more control over the pressure.
Overwatering When it Rains
If you experience puddles and areas that collect water when it rains you will find an irrigation controller with rain sensor extremely valuable. In addition to preventing puddles and muddy areas you'll promote healthier plants and vegetation. The money you save with the reduced water usage will likely pay for the controller in the first season of use not to mention you'll be helping conserve water in your area.
Whether you're carrying out your drip irrigation installation in Canada or any climate that experiences freezing temperatures, a proper winterizing is necessary every year. Learn more about drip Irrigation winter care and design tips to make winterization easier and hassle free. If you would like to hire a professional irrigation installer in Kelowna or surrounding Okanagan Valley contact us and we'll get back to your as quickly as possible.
Disclaimer
Please use all appropriate and proper safety precautions when attempting projects on this website. All projects are attempted at the reader's own risk.
Duralawn® participates in the Amazon Services LLC Associates Program, as an Amazon Associate we may earn a commission from qualifying purchases.
Duralawn® artificial grass installations, products and service in Kelowna, Vernon, Penticton, etc since 2018.

